How to add authentication to your app with Supabase

Today I'll teach you how to use Supabase to add a complete, simple, and secure authentication service to your project. If you are unfamiliar with Supabase, it is a Backend-as-a-Service (BaaS) that provides essential features such as a RESTful API connected to a Postgress database, serverless functions, and, most importantly, authentication, the topic of this blogpost.
If you're interested to learn more about the RESTful API, check out my previous blogpost where I walk you through the process of creating a comprehensive CRUD application with Supabase.
Table of contents
Introduction
The authentication process might be tough to grasp and even more difficult to include into your solution. This approach is now a piece of cake thanks to Supabase, which I talked about in a previous blogpost.
The authentication solution provided by Supabase is a mix of JWT (JSON Web Token) and API key. Essentially, as long as a user makes API requests without a JWT, he will be deemed an anonymous user and will have restricted access to the API, in our case only the login and register API.If, on the other hand, the user uses a JWT to make API calls, he will be authorized to make any API calls within the scope of the role he has been assigned.
Today, I'll be adding their authentication service to the previous blogpost's dashboard app built with Remix. In a nutshell, this is a dashboard that allows you to manage a list of video games. The client makes API calls to a database housed on Supabase.
If you are unfamiliar with Supabase, I strongly advise you to read my my previous blogpost first because I will be working on a previously constructed Supabase project!
The goals:
1/ Add a login and a register page.
2/ Prevent unauthorized users from accessing the dashboard.
3/ Only allow authorized users to access the dashboard by sending requests with a JWT.
Supabase setup
Before we dive into the code, we need to make some changes to the Supabase dashboard. First, we need to enable authentication and then apply policies to the database so that only authenticated users can interact with the dashboard.
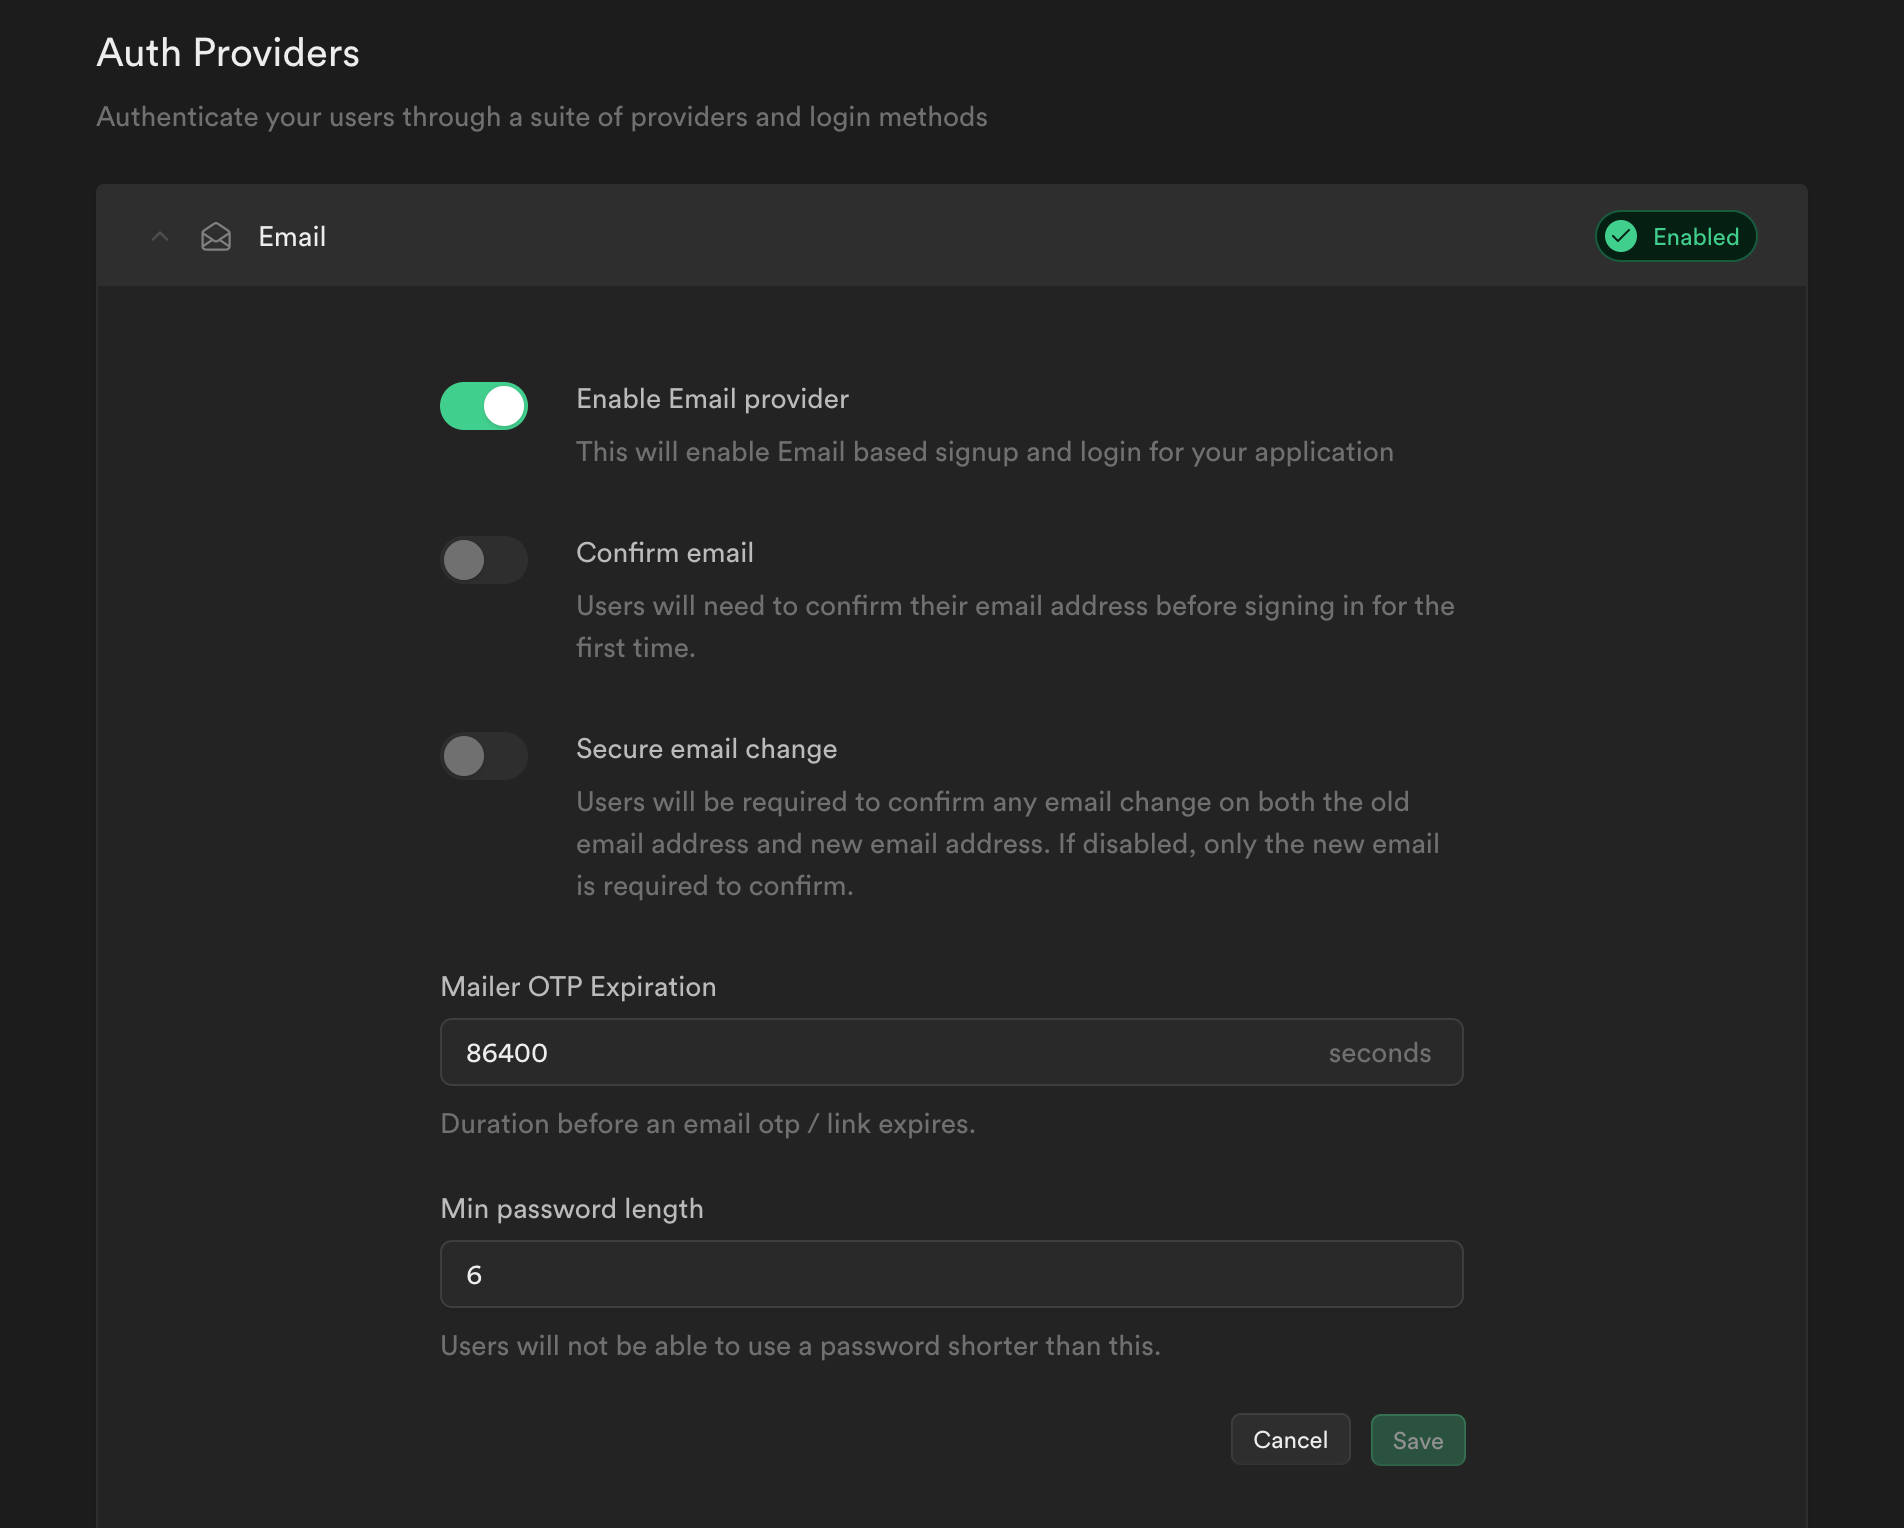
So first make sure to have enabled email authentication, to keep it simple I won't handle email confirmation. Navigate to Authentication > Providers via the left menu bar.
To begin, ensure that email authentication is enabled; to keep things simple, I will not handle email confirmation. Using the left menu bar, navigate to Authentication > Providers.
There are numerous providers available; in this example, we will use email authentication. The user must authenticate using the standard email/password combination.
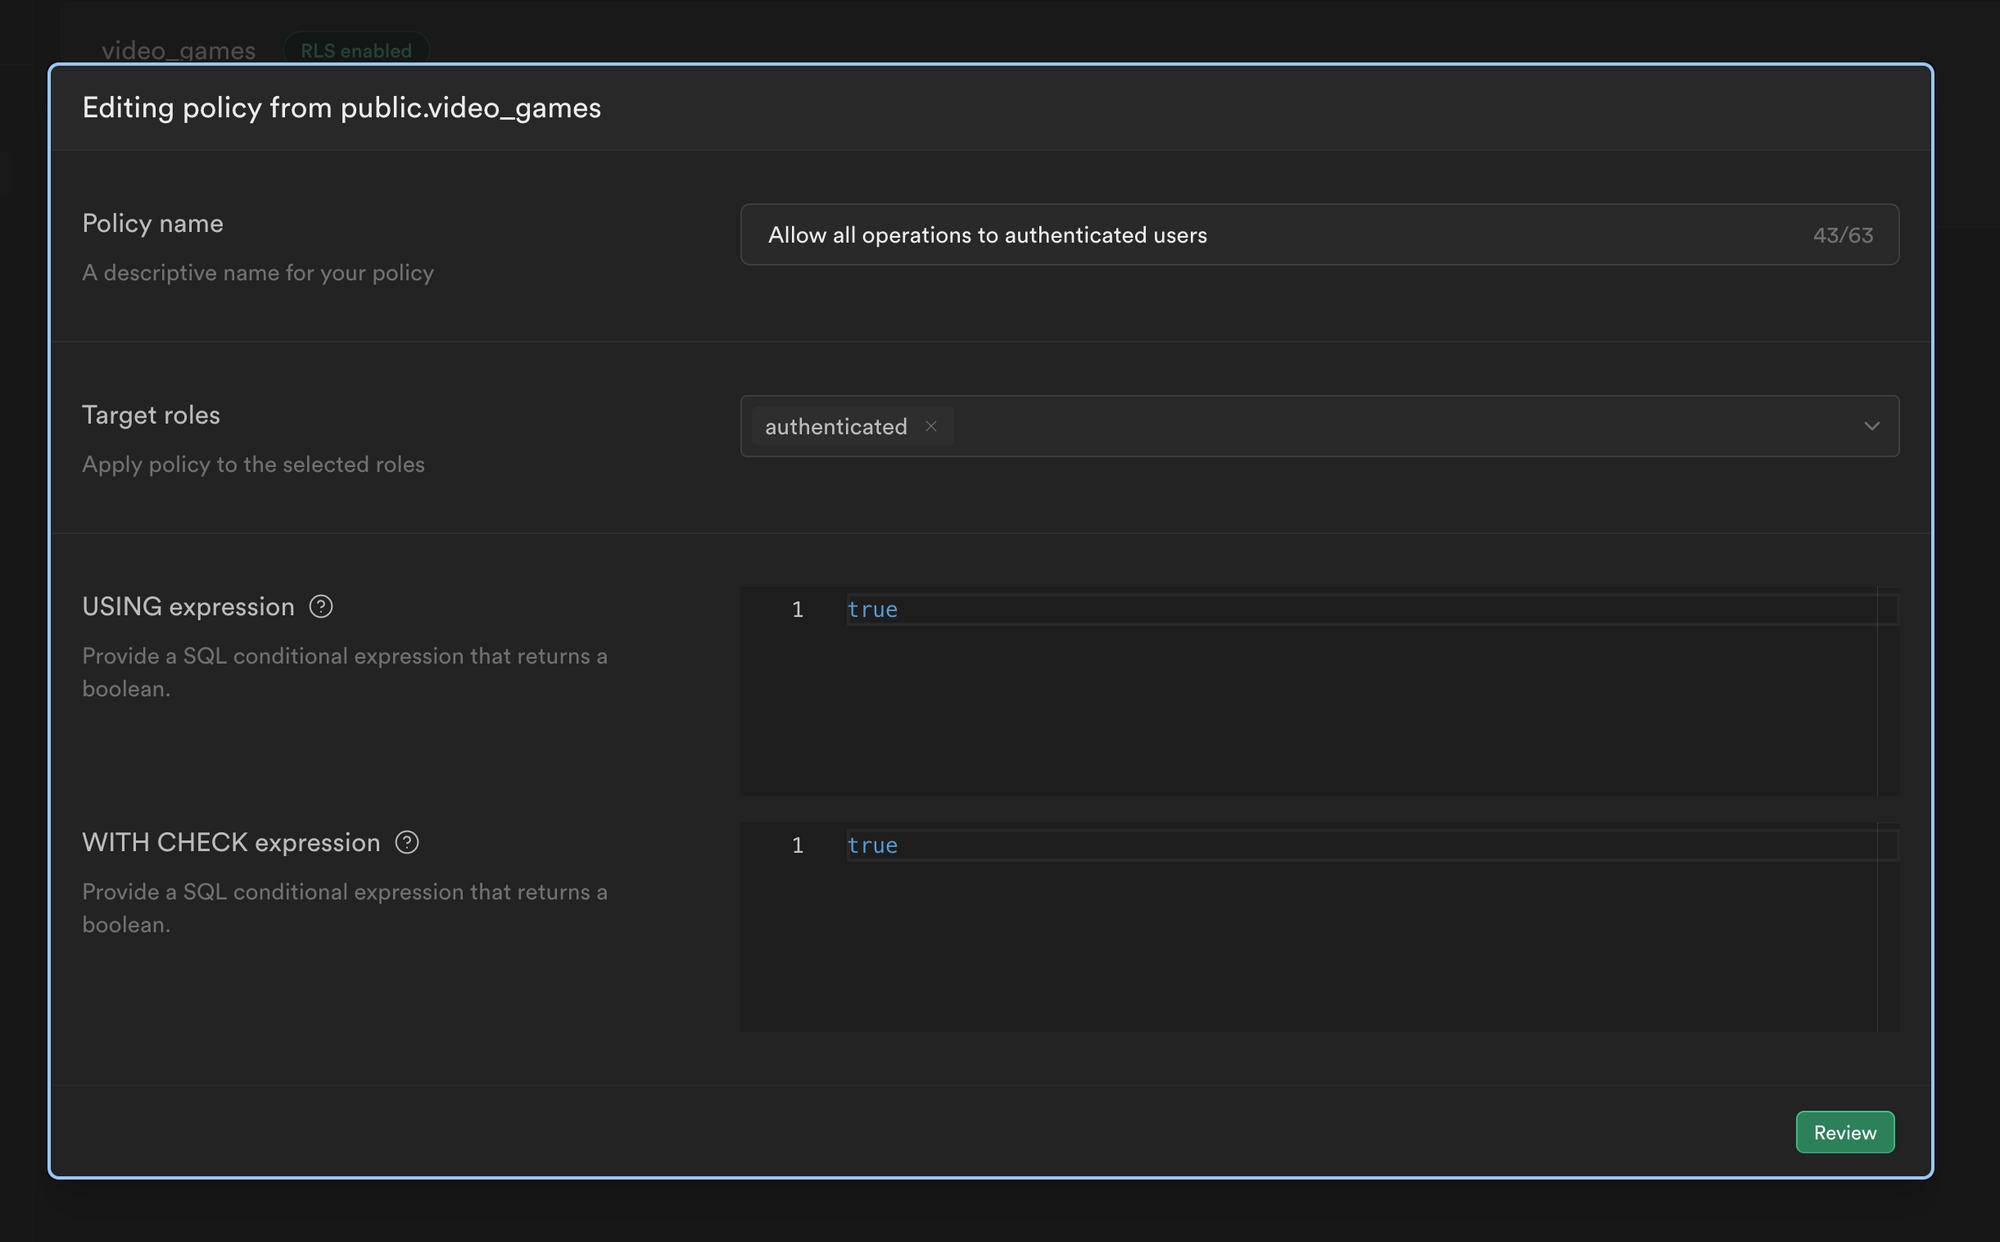
Next, we will add a policy to our database in order to restrict access to our database API. The following policy is straightforward; it grants read/write access to all authenticated users; however, keep in mind that you can go even farther.
That's all there is to it! We are now ready to implement authentication in our front-end application.
Front-end setup
Before we can truly implement the authentication process in our Remix app, as we did in Supabase, we need to make certain changes, which we will go over before continuing on.
Implementing the authentication helper
Supabase provides us with various authentication helpers to integrate into our app via a package that can be found here.
It should be noted that Remix also provides utilities to assist us in handling user sessions, but because this article is about Supabase, we will use their helper.
First, install the Remix package, which will handle session cookie management behind the scenes. They also provide clear and straightforward documentation on how to build it, which we will follow but modify somewhat.
$ npm install @supabase/auth-helpers-remix
In my previous blogpost about Supabase, I created a function to use the supabase client ONLY in the server-side, but now we will need to use a supabase client in the client-side as well, so we will implement it.
First let's update the server-side supabase client:
supabase.ts
import { createServerClient } from "@supabase/auth-helpers-remix";
import type { Database } from "~/types/database";

// Initialize a supabase client to be use on the server-side
export const getSupabaseServerClient = (request: Request, response: Response) =>
  createServerClient<Database>(process.env.API_URL!, process.env.API_KEY!, {
    request,
    response,
  });
Now we are going to update the root.tsx file which serves as the entry point of the application. We are going to create a client-side supabase client in it and expose it to every routes of the application.
We will also build logic to synchronize our client and server supabase clients in the event that the client-side becomes desynchronized.
First let's return the API_KEY and API_URL and the session from the server to the client with the loader function:
root.tsx
// Return the user session and env values to the client
export const loader = async ({ request }: LoaderArgs) => {
  const response = new Response();
  const env = {
    API_URL: process.env.API_URL!,
    API_KEY: process.env.API_KEY!,
  };
  const supabase = createServerClient<Database>(
    process.env.API_URL!,
    process.env.API_KEY!,
    { request, response }
  );

  // Retrieves the user session to synchronize it with the client
  const {
    data: { session },
  } = await supabase.auth.getSession();

  return json({ env, session }, { headers: response.headers });
};
Now we will retrieve those values in the client component, store the Supabase client in a state, then implement the synchronization logic in a useEffect, and finally pass the supabase client to every routes via the Outlet context:
root.tsx
export default function App() {
  const submit = useSubmit();
  const { env, session } = useLoaderData<typeof loader>();
  const serverAccessToken = session?.access_token;
  // Create a single instance of the supabase client to be used on the client side
  const [supabase] = useState(
    createBrowserClient<Database>(env.API_URL, env.API_KEY)
  );

  // Synchronize the client-side supabase instance with the server-side one
  useEffect(() => {
    const {
      data: { subscription },
    } = supabase.auth.onAuthStateChange((event, session) => {
      // If the tokens are not the same, this means client and server are not synchronized
      // Thus we send a get request to trigger the loader which will provide the client a new Supabase client instance
      if (session?.access_token !== serverAccessToken) {
        submit(null, { method: "get" });
      }
    });

    return () => {
      subscription.unsubscribe();
    };
  }, [serverAccessToken, submit, supabase.auth]);

  return (
    <html lang="en">
      <head>
        <Meta />
        <Links />
      </head>
      <body className="text-white">
        {/** Pass the supabase client down to every child components via the outlet context */}
        <Outlet context={{ supabase }} />
        <ScrollRestoration />
        <Scripts />
        <LiveReload />
      </body>
    </html>
  );
}
We can now conduct API calls to the Supabase API from the client, and we have ensured that the client and server remain synced.
The next step is to develop a login and a register page to authenticate a user in our application. Let's start with the registration page; you'll see a games folder and a games.tsx file below the files tree within the route folder; we'll go over this later.
- routes
- games
- $gameId.tsx
- create.tsx
- index.tsx
- games.tsx
- index.tsx
- login.tsx
- register.tsx
- games
Let's create the register page.
First, we will check the server to see if the user has already been authenticated; if so, he will be redirected to the dashboard:
register.tsx
export const loader = async ({ request }: LoaderArgs) => {
  const response = new Response();
  const supabase = getSupabaseServerClient(request, response);

  const {
    data: { session },
  } = await supabase.auth.getSession();

  if (session) {
    return redirect("/games", { headers: response.headers });
  }

  return null;
};
Now, in the client component, we will retrieve the supabase client from the Outlet context in order to execute the authentication API call to Supabase from the client; if the call is successful, the user will be sent to the dashboard; otherwise, an error message will be displayed:
register.tsx
export default function Register() {
  const { supabase } = useOutletContext<OutletContext>();
  const submit = useSubmit();
  const [registerError, setRegisterError] = useState<string>();
  const methods = useForm<RegisterForm>({
    defaultValues: {
      email: "",
      password: "",
    },
    resolver: yupResolver(registerFormValidation),
  });

  const onSubmit: SubmitHandler<RegisterForm> = async (values) => {
    const { error } = await supabase.auth.signUp(values);

    if (error) {
      setRegisterError(error.message);
    } else {
      // Trigger the current route loader via a get request, this will redirect the user to the dashboard
      submit(null, { method: "get" });
    }
  };

  return (
    // Your form...
  );
}
Moving on to the login page, you can use the same logic as the registration page, with the only significant difference being in your form submit handler function, which we will refer to as the sign in API route rather than the register API route:
login.tsx
  const onSubmit: SubmitHandler<LoginForm> = async (values) => {
    const { error } = await supabase.auth.signInWithPassword(values);

    if (error) {
      setLoginError(error.message);
    } else {
      // Send a get request to trigger the current route loader
      submit(null, { method: "get" });
    }
  };
Great! We now have routes to register and authenticate a user, and thanks to the helper package we previously installed, we don't need to deal with session/cookies. You can check the application tab in Chrome Dev Tools and see that a cookie is created when you are successfully authenticated.
Let's dive into the last part of this tutorial, which will block unauthenticated users from accessing the dashboard, because you may still access it without being authenticated, which we don't want.
Let's take a look back at the routes files tree:
- routes
- games <---
- $gameId.tsx
- create.tsx
- index.tsx
- games.tsx <---
- index.tsx
- login.tsx
- register.tsx
- games <---
The existence of a games folder and a games.tsx file is due to Remix' way of creating layout components. You can see in my dashboard that I have three files: index.tsx, which is the main route that lists the video games, create.tsx, which clearly adds a new video game to the list, and $gamedId.tsx, which is a dynamic route that updates a video game from the list.
If I don't want an unauthenticated user to be able to access one of those three routes, I could add a loader function that fetches the user session and, if it fails, redirects the user to the login page, as I did on the login and registration pages. This is exactly what I'm going to do, but imagine we had a hundred routes instead of three; you wouldn't want to rewrite this logic in each one 😧
That's why we are going to create a layout component for those three routes and simply include the check authentication once. This layout will be used by every route in the games folder:
games.tsx
// Redirect the user to the login page if he is not logged in
export const loader = async ({ request }: LoaderArgs) => {
  const response = new Response();
  const supabase = getSupabaseServerClient(request, response);

  const {
    data: { session },
  } = await supabase.auth.getSession();

  if (!session) {
    return redirect("/login", { headers: response.headers });
  }

  return json({ userEmail: session.user.email }, { headers: response.headers });
};
And voilà! Now you won't be able to access the dashboard without being authenticated!
Conclusion
As you can see, implementing an authentication service using Supabase is not as complex as it is with the RESTful API. Keep in mind that I only provided a basic example of implementation; you may go further with role-based access control via database policies, as well as install additional authentication services such as Apple, Microsoft, Google, and More.
I pulled some code from the examples to avoid overwhelming you with code, but you can get the source code here.
Thank you for reading this far; if you find this blogpost useful, please share it with others 👋
Check out our previous blogpost about Supabase