Scaffold a full stack app with Supabase and Remix

Today, there are so many technologies available to help us build a full stack app that it can be difficult to choose the one that will best suit our needs. I'll show you a simple and quick solution: Supabase and Remix! 🚀
Table of contents
Introduction
Supabase is an open-source alternative to Firebase, it will give us access to useful tools such as a database, authentication service, edge functions, and storage. Their free tier is sufficient for developing a small app. To keep things simple, I'll only show you how to use their database product in this article.
Remix is a React-based full stack framework that focuses on user interface and web fundamentals.
We will create a simple web dashboard to manage a list of video games; this simple example will enable us to perform all CRUD operations.
The database and API will be hosted by Supabase, and we will use this API to render a dashboard with Remix.
Supabase setup
Let's start with the Supabase setup, I will assume that you already have an account, if not, go ahead and create one before returning to this tutorial.
Before you can start working on your project, you must first create an organization. Remember to keep your database password safe!
At this point, I recommend that you explore the dashboard and read the documentation to become familiar with it. Then go ahead and start working on your project.
When your project is finished, navigate to the database section via the left menu bar; you'll notice that I've already created a table.
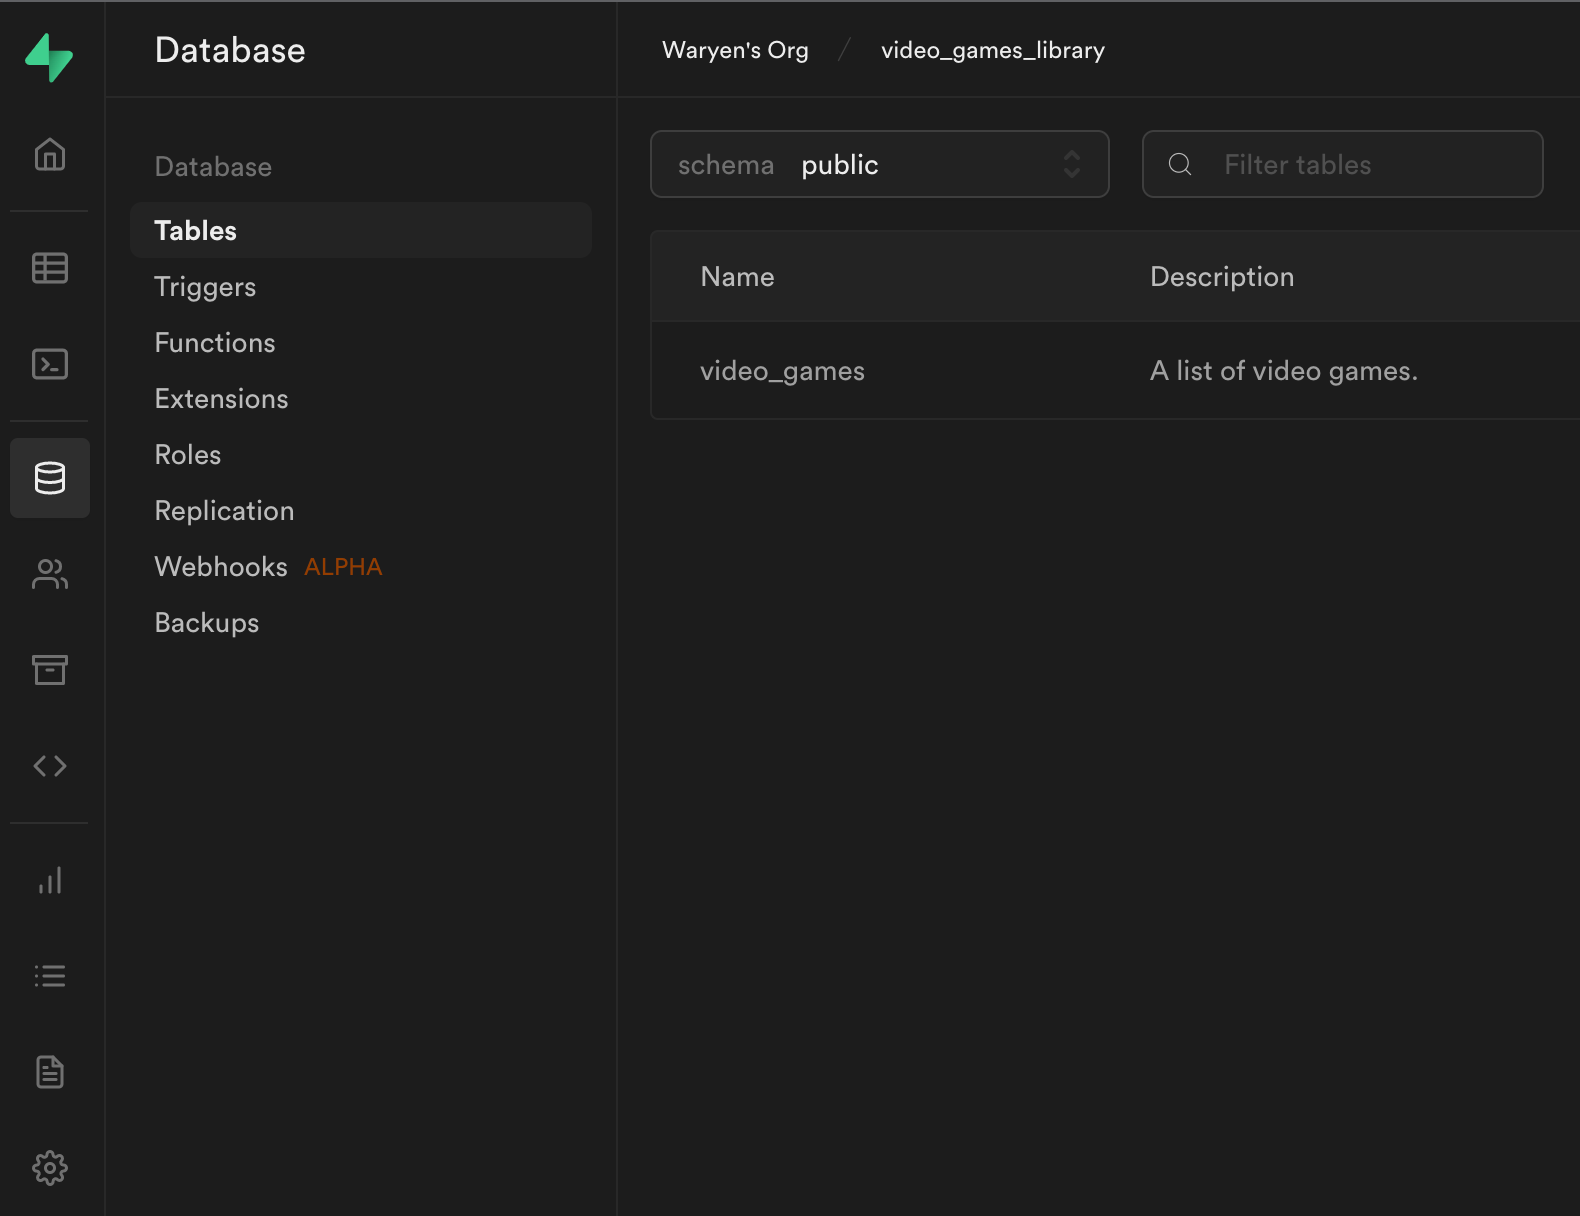
Go ahead and create a new table.
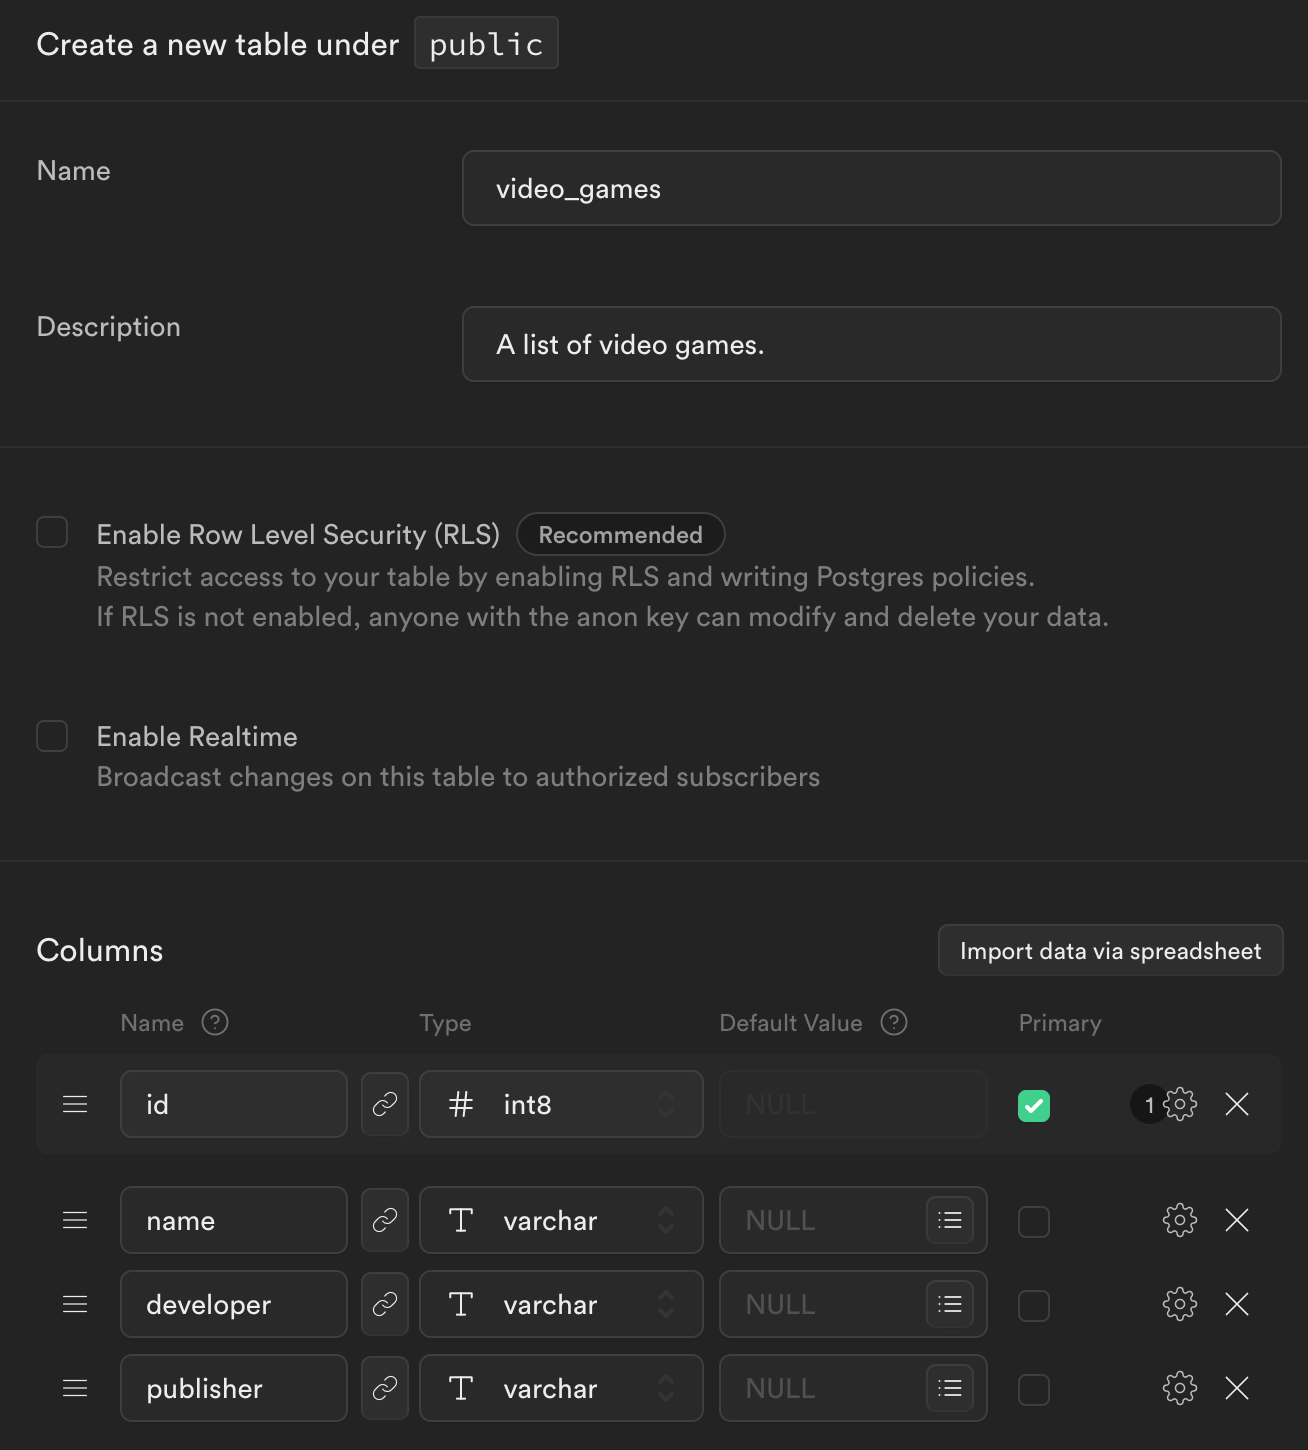
Take note that I have unchecked Row Level Security because I will not implement authentication to the app, allowing anyone with the API key to perform database operations (I will talk about authentication in an other blogpost so stay tuned). You should not do this in production, but I will do so to keep this tutorial simple and to the point.
After you've created your table, navigate to the API docs section via the left menu bar, where you'll find a cool Supabase feature, an auto-generated API for their JavaScript client. The API documentation is updated when you add, edit, or delete databases in your project.
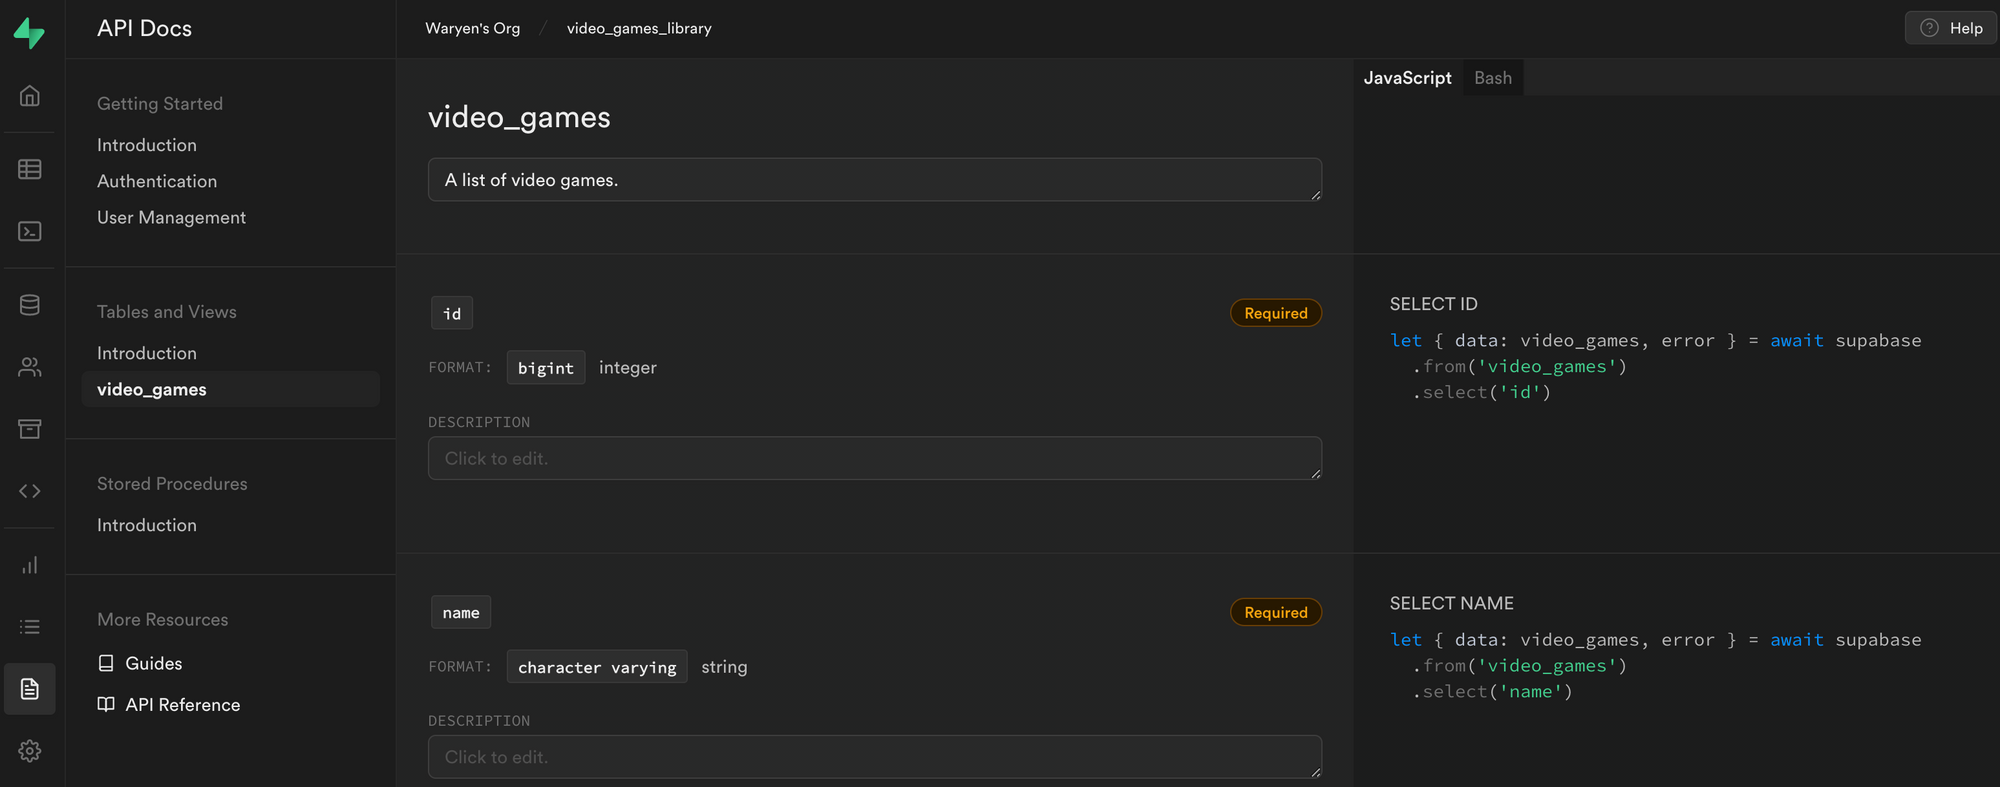
Keep this page open; we'll return to it once we've implemented the API in our Remix app.
That's all there is to it on the Supabase side!
Dashboard building
Now let's jump into Remix!
Let's start by initializing the app. I assume that you already have Node.js installed on your computer.
Here are the versions of the main tools/packages I will be using here:
- Node.js: v18.12.1
- Remix: 1.9.0
- React & React DOM: 18.2.0
- Supabase JS client: 2.2.2
$ npx create-remix@latest
Once you've created your app, go ahead and install all the dependencies we will need, including the Supabase JavaScript client.
# Supabase JavaScript client
$ npm install --save @supabase/supabase-js
# react-hook-form and validations
$ npm install --save react-hook-form yup @hookform/resolvers
As you can see I've added react-hook-form along with form validation helpers. It has nothing to do with Remix or Supabase, but it will change the way I handle form submission in Remix a little.
I will use Tailwind CSS for the styling part, here is how to setup your Remix app with it.
First, let's create a reusable function to initialize a Supabase client to perform API calls anywhere in the web app as long as I use it on the server and not the client because I'm using environment variables.
You can grab your API url and API key from Supabase's dashboard API section.
supabase.ts
/**
 * Initialize a supabase client, used to make API calls.
 */
export const supabase = createClient<Database>(
  process.env.API_URL!,
  process.env.API_KEY!
);
You may have noticed the Database type that is passed in the createClient function's generic. This is required if you wish to type the data returned by all API calls. Learn more about this practice by clicking here.
Speaking of types, here are a few that I will be using in the project, as well as the Database type that will be used to type my API calls.
games.ts
export type Game = {
  id: number;
  name: string;
  publisher: string;
  developer: string;
};

export type GameForm = Omit<Game, "id">;
database.ts
import type { Game } from "./games";

export interface Database {
  public: {
    Tables: {
      video_games: {
        Row: Game;
        Insert: Omit<Game, "id">;
        Update: Omit<Game, "id">;
      };
    };
    Views: {};
    Functions: {};
  };
}
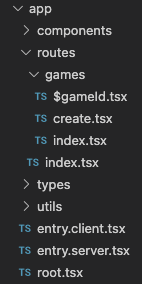
After that, we can begin creating our routes; I'll make a folder called games at the root of the routes folder.Within that folder I will create three files
- index.tsx - The default route which displays the list of video games.
- create.tsx - The page where you can add a new video game to the list.
- $gameId.tsx - A dynamic route which will receive a video game's id to render an edit form.
Here is how it will look like in VSCode:
In each route, you'll notice that I export a loader and/or an action function from which I make API calls using the Supabase client. Check out their documentation if you're not sure how to handle data loading and data mutations in Remix.
In a nutshell, those functions are kept on the server and will only run on the server. In my case, the loader function allows me to retrieve data from my Supabase database as well as capture url parameters. I can use the action function to send data to my Supabase database.
It should be noted that all data mutations are performed via a form submission to the server; this is the primary method of working with Remix.
index.tsx
In this file, I will retrieve and render a list of video games from the Supabase database.
// fetch the list of video games on the server and return them to the client side
export const loader = async () => {
  const { data, error } = await supabase.from("video_games").select("*");
  return json({ games: data, error });
};

// handle the deletion of a video game on the server
export const action = async ({ request }: ActionArgs) => {
  const formData = await request.formData();
  const id = formData.get("id");
  const { error } = await supabase.from("video_games").delete().eq("id", id);
  return json({ error });
};

// UI component
export default function Index() {
  const { games, error } = useLoaderData<typeof loader>();
  const actionData = useActionData<typeof action>();
  const submit = useSubmit();

  // send the id of the video game to delete as a form to the server
  const handleDelete = (id: number) => {
    submit({ id: id.toString() }, { replace: true, method: "post" });
  };

  return (
    // ...
  )
}
create.tsx
Here is the creation form for adding a video game to the database.
// create a video game on the server
export const action = async ({ request }: ActionArgs) => {
  const formData = await request.formData();
  const name = formData.get("name")?.toString();
  const developer = formData.get("developer")?.toString();
  const publisher = formData.get("publisher")?.toString();

  if (!name || !developer || !publisher) {
    return json({ error: "Unable to retrieve the form values" });
  }

  const { error } = await supabase
    .from("video_games")
    .insert([{ name, developer, publisher }]);

  if (error) {
    return json({ error: error.message });
  }

  return redirect("/games");
};

// UI component
export default function Create() {
  const transition = useTransition();
  const actionData = useActionData<typeof action>();
  const submit = useSubmit();

  // ...

  // send the new video game data to the server as a form
  const onSubmit: SubmitHandler<GameForm> = (values) => {
    submit(values, {
      method: "post",
    });
  };

  return (
    // ...
  );
}
$gameId.tsx
Finally, the edit form will fetch a specific video game based on the id I passed as a url parameter to pre-populate the fields with default values.
// fetch a specific video game on the server based on his id and then return it to the client
export const loader = async ({ params }: LoaderArgs) => {
  const { gameId } = params;
  const { data } = await supabase
    .from("video_games")
    .select("*")
    .eq("id", gameId);

  return json({
    defaultValues: data?.[0],
  });
};

// update a video game based on his id on the server
export const action = async ({ request }: ActionArgs) => {
  const formData = await request.formData();
  const id = formData.get("id");
  const name = formData.get("name")?.toString();
  const developer = formData.get("developer")?.toString();
  const publisher = formData.get("publisher")?.toString();

  if (!id || !name || !developer || !publisher) {
    return json({ error: "Unable to retrieve form values" });
  }

  const { error } = await supabase
    .from("video_games")
    .update({ name, developer, publisher })
    .eq("id", id);

  if (error) {
    return json({ error: error.message });
  }

  return redirect("/games");
};

// UI component
export default function Edit() {
  const transition = useTransition();
  const submit = useSubmit();
  const { defaultValues } = useLoaderData<typeof loader>();
  const actionData = useActionData<typeof action>();

  if (!defaultValues?.id) {
    throw new Error("This item doesn't exist");
  }

  // ...

  // send the new video game data to the server as a form
  const onSubmit: SubmitHandler<GameForm> = (values) => {
    submit({ id: defaultValues?.id.toString(), ...values }, { method: "post" });
  };

  return (
    // ...
  );
}
And voilà! In just a few minutes, you've built a full stack app with Supabase and Remix!
Quick demo
Here's a quick demonstration of what the app we built in this article can do.
Conclusion
With this small example, I demonstrated how easy it is to scaffold a full stack app and perform CRUD operations on a database in a matter of minutes.
I'd known Remix for a while and knew it could handle the case I wanted to show you. But the main product here is Supabase, which provides us with a set of tools that will allow us to develop our backend quickly.
I only showed you how to create a database and interact with it using the API that was generated for you. However, they have additional tools such as Authentication (which I will discuss in a future blogpost, so stay tuned) and Storage.
Their free tier is adequate for testing everything before considering subscribing to their pro tier, which costs $25 per project per month.
Supabase is a great platform, I will keep an eye on it and continue to test their features.
Thanks for reading this far. I hope you found this article useful; if so, please share it with your networks; the source code for this project can be found in that repository
See you soon! 👋
Explore SolidJS with Turborepo and Vanilla