An introduction to Intrusion Detection and Intrusion Prevention Systems (IDS/IPS)

In this blogpost, I will explain the concepts of Intrusion Detection and Intrusion Prevention Systems (IDS/IPS), outline the reasons for considering their implementation, and discuss two potential solutions that may meet your needs, such as SNORT and Security Onion.
What is an IDS/IPS ?
When you have on-premise devices, you should set up an Intrusion Detection System (IDS) and/or an Intrusion Prevention System (IPS).
Depending on the requirements, these systems can be passive or active. If you need to protect your network like a fortress, they are part of the security layer.
IDS
Intrusion Detection System (IDS) are used to detect all unwanted flow. This traffic could be a virus, an attack, pentesting, and so on.
The goal of the IDS is to find activity based on rules from a network or an host. If the target is a network we speak about Network Intrusion Detection System (NIDS) and if the target is an host then we talk about Host Intrusion Detection System (HIDS).
The IDS's purpose is to detect activity based on rules from a network or a host. If the target is a network, we refer to it as a Network Intrusion Detection System (NIDS), and if the target is a host, we refer to it as a Host Intrusion Detection System (HIDS).
The HIDS is monitoring the process, the users, and the resources. Again, using rules, we can detect anomalies such as the use of certain commands, the start of a process, a virus, or the time of a remote connection. It frequently works as a client-server model, so you have a client on your endpoint to check and a control HIDS that acts as a server to aggregate all alerts.
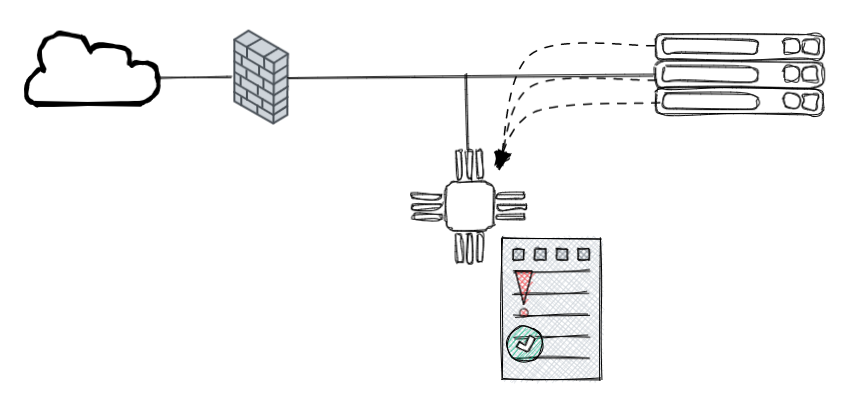
The NIDS is passive and isolated from the network, which means he only sees a copy of the traffic but it does not pass through it (as opposed to an IPS).
IPS
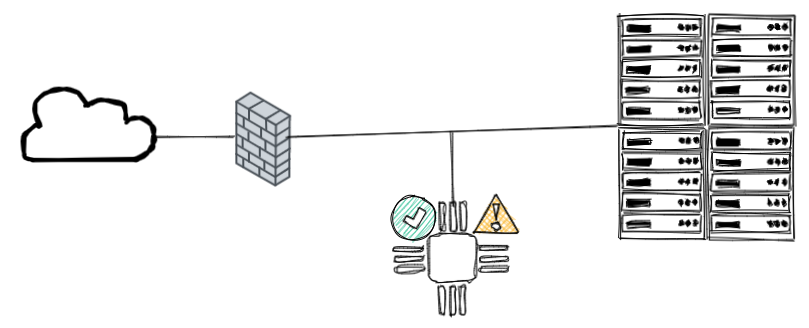
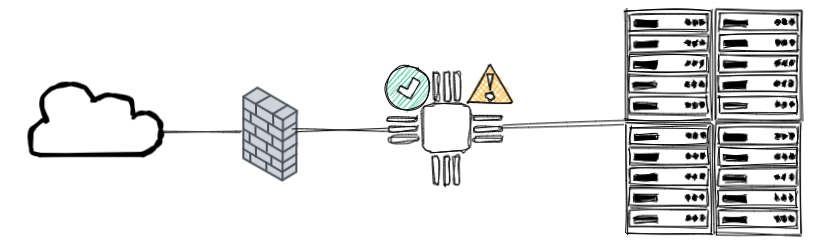
When an Intrusion Prevention System (IPS) is present in your network, traffic is routed through it so that he can analyze and respond to unwanted flow.
IPS can be Network Intrusion Prevention System (IPS). The NIPS analyzes the network using multiple attack databases to block unwanted traffic.
NIPS are not a type of firewall. They don't do the same thing, but they complement each other. A firewall is typically a filter, blocking or allowing traffic, whereas an IPS detects, alerts, and can act on anomalies based on a signature database.
Some firewalls provide an IPS role, known as an NIPS, that can be configured directly from the firewall. This can be used as an extra layer of security, but it is ineffective as a standalone NIPS. If you only have a firewall with NIPS and it is hacked, you are losing two layers of security instead of one.
IPS can also be Host Intrusion Prevention System (HIPS). The HIPS analyzes hosts based on actions or processes to prevent malicious activity.

Some antivirus solutions can be considered HIPS simply because they provide more and more options. An antivirus is primarily concerned with detecting, blocking, and removing viruses or malware. It was not intended to check your process, but some solutions can now be remotely managed, checking for strange processes, ransomwares, and so on. As a result, an antivirus can be a HIPS when a HIPS is more than just an antivirus.
IPS and IDS are security layers, but they have some drawbacks. They, like many other tools, must be kept up to date at all times. It is not wise to rely on this tool to advertise some strange activity when the system is corrupted. The signature database must also be kept up to date as they grow over time.
When NIDS is not directly communicating with your network, NIPS are a part of it and can be targeted by attacks or sometimes block legitimate flow when it appears unwanted.
Now that you've grasped the fundamentals, let's dig deeper by implementing one of the most well-known tools, SNORT. At the end of the article, I'll briefly mention Security Onion as another powerful option you can use.
Implementing SNORT

SNORT is an open-source, rule-based Network Intrusion Detection and Prevention System (NIDS/NIPS)
To understand better, you should first look at the modes that Snort can run in, then what rules are and how to create them, and finally how to install it.
MODES
Snort has three main use models
- Sniffer Mode - Read IP packets and prompt them in the console application.
- Packet Logger Mode - Log all IP packets (inbound and outbound) that visit the network.
- NIDS (Network Intrusion Detection System) and NIPS (Network Intrusion Prevention System) Modes - Log/drop the packets that are deemed as malicious according to the user-defined rules.
Sniffer
-v |  Verbose. Display the TCP/IP output in the console.
-d |  Display the packet data (payload).
-e |  Display the link-layer (TCP/IP/UDP/ICMP) headers.
-X |  Display the full packet details in HEX.
-i |  This parameter helps to define a specific network interface to listen/sniff. Once you have multiple interfaces, you can choose a specific interface to sniff.
Packer Logger
-l | Logger mode, target log and alert output directory. Default output folder is /var/log/snort
The default action is to dump as tcpdump format in /var/log/snort
-K ASCII | Log packets in ASCII format.
-r | Reading option, read the dumped logs in Snort.
-n | Specify the number of packets that will process/read. Snort will stop after reading.
Snort can read logs with the -r option. There are two way to create logs:
1: With -l → binary log
2: With -K ASCII → a human readable log (but snort cannot open the file with -r, tcpdump neither)
NIDS / IPS
-c | Defining the configuration file.
-T | Testing the configuration file.
-N | Disable logging.
-D | Background mode.
-A | Alert modes;
Type of alert modes :
full : Full alert mode, providing all possible information about the alert. This one also is the default mode; once you use -A and don't specify any mode, snort uses this mode.
fast : Fast mode shows the alert message, timestamp, source and destination IP, along with port numbers.
console : Provides fast style alerts on the console screen.
cmg : CMG style, basic header details with payload in hex and text format.
none : Disabling alerting.
NIDS Modes
With -A console → Give alert on the console directly
With -A cmg → Give alert on the console with basic header details with payload in hex and text
With -A full → Give all possible information about the alert.
With -A fast → Checking with summary / direction and header. All go to /var/log/snort/alert file
With -A none → No alerting but keep logging the traffic and create the binary dump
Launching the daemon
1sudo snort -c /etc/snort/snort.conf -D
It should be noted that daemon mode is primarily used to automate Snort. This parameter is mainly utilized in scripts to enable the Snort service to run in the background. This mode should not be used unless you have a working knowledge of Snort and a stable configuration.
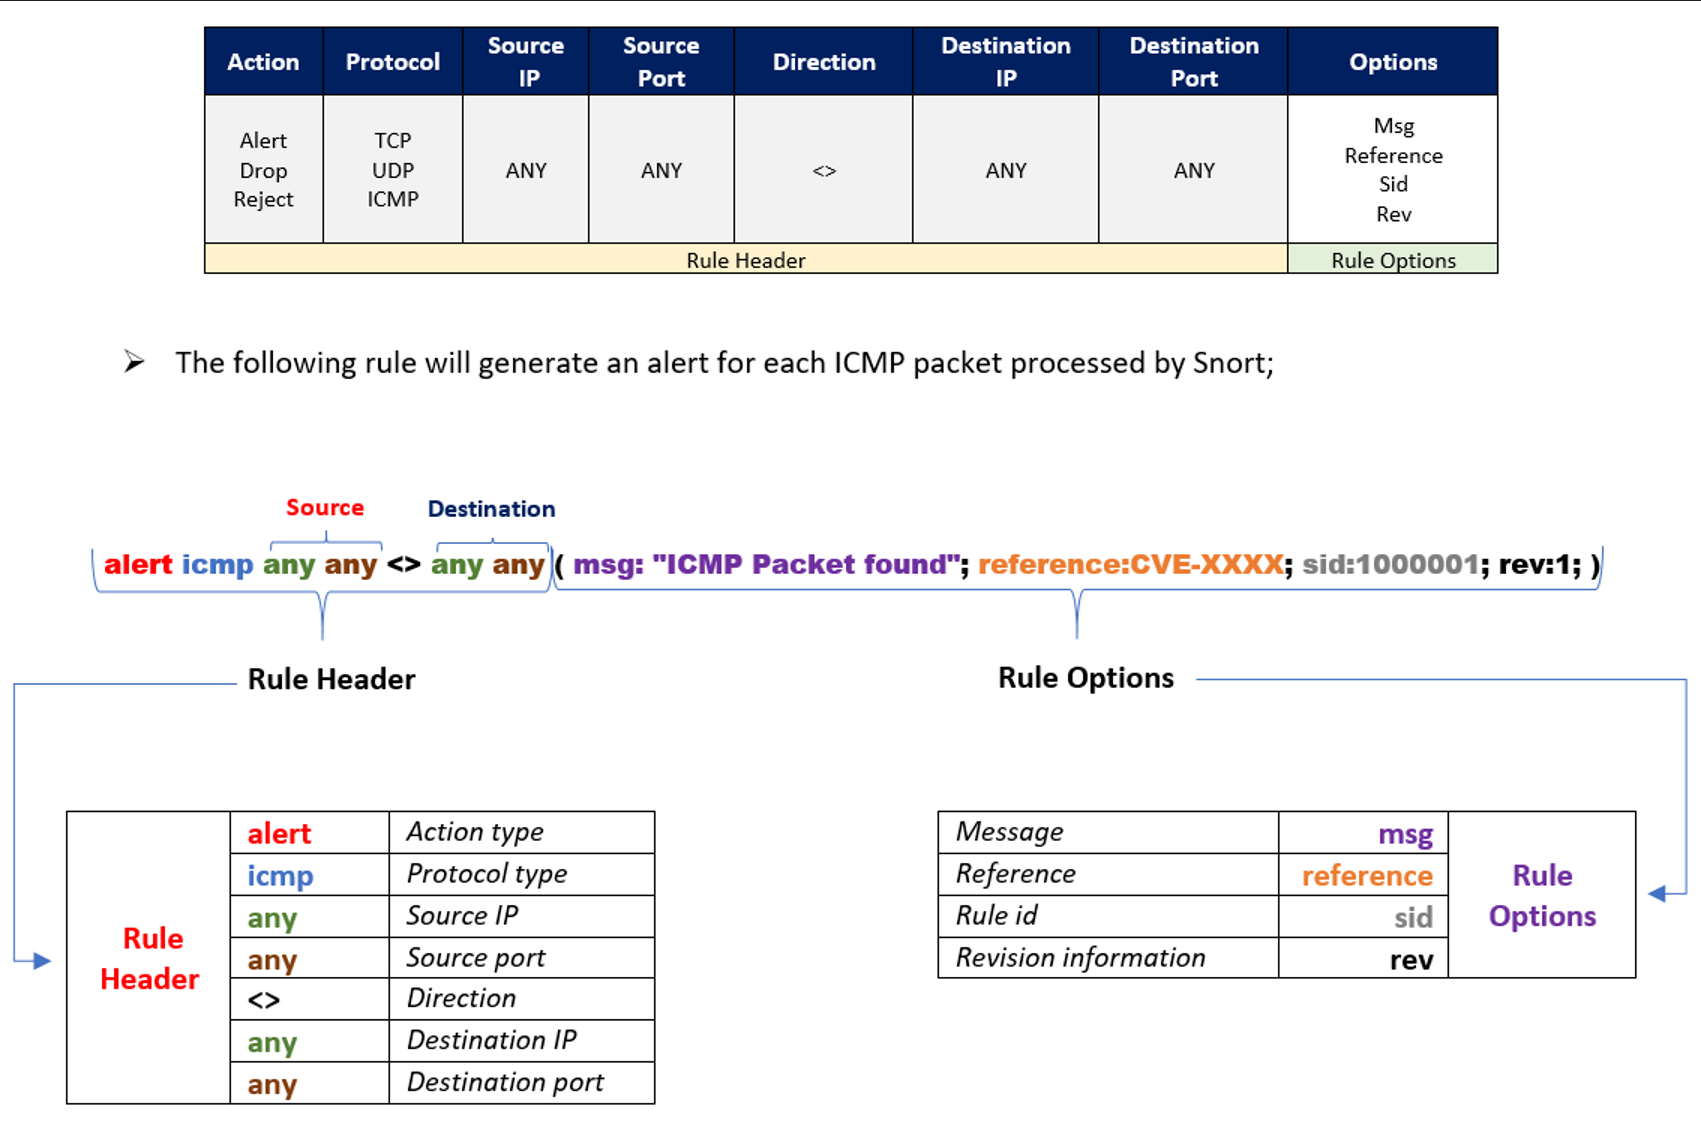
RULES
The way SNORT create alerts is based on rules. Rules are in /etc/snort/rules/
If you need to create local rules (custom rules), create a file local.rules inside of this folder.
Source : TryHackMe
Here is an example of one rule from the file rule named “exploit.rules”
alert tcp $EXTERNAL_NET 80 -> $HOME_NET any (msg:"EXPLOIT winamp XM module name overflow"; flow:established,from_server; content:"Extended module|3A|"; nocase; isdataat:20,relative; content:!"|1A|"; within:21; reference:url,www.nextgenss.com/advisories/winampheap.txt; classtype:attempted-user; sid:2550; rev:2;)
Here another one that you can make yourself
alert tcp any any -> any any (content:"facebook.com"; msg:"Facebook isbeing used!!"; sid:100001; rev:1)
How to install it
We realized that an IDS was necessary and identified Snort as the most suitable option. The availability of a free community version was a crucial factor in our decision.
There are alternatives such as Zeek, OSSEC, or Suricata.
To access the installation guide for Snort, you will have to navigate through the Documents section, as only a few links are displayed on the Snort page.
The guide, which supports Ubuntu 18 and 20, is written by the same person responsible for providing all other setup guides.
During the process, the wizard will ask obvious questions. Eg. on which interface you want to use Snort.
After the installation, typing snort -V will display the installed version and confirm that the setup is functional.
The tool itself is not autonomous, meaning that it's not able to start with the operating system or even to update rules tables.
Make it automatic
To address the first problem, we must create a systemd service called snort.service with the following configuration.
[Unit]
Description=Run SNORT Daemon

[Service]
Type=simple
ExecStart=snort -c /etc/snort/snort.conf -D -A fast
Restart=always

[Install]
WantedBy=multi-user.target
After a systemctl daemon-reload, a reboot, we are able to run systemctl start snort to verify the service.
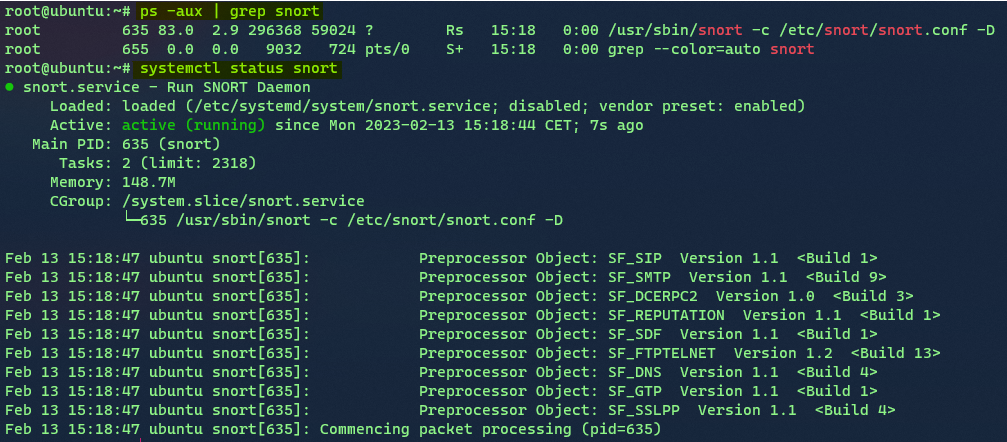
Then we just do systemctl enable snort.

Make it up to date
To solve the second issue, we need pulledpork. It's not as important for the community version because the rules aren't changed as frequently as they are for the paid versions. However, it is still preferable to have this implemented because it is simple and free.
Step to install and configure pulled pork :
sudo su -
apt-get install -y libcrypt-ssleay-perl liblwp-useragent-determined-perl
wget https://github.com/shirkdog/pulledpork.git
cd pulledpork
cp pulledpork.pl /usr/local/bin
chmod +x /usr/local/bin/pulledpork.pl
cp etc/*.conf /etc/snort
mkdir /etc/snort/rules/iplists
touch /etc/snort/rules/iplists/default.blacklist
/usr/local/bin/pulledpork.pl -V
The latst line tests the installation of Pulled Pork
Change the config file
vim /etc/snort/pulledpork.conf
Put in comments the rule_url except for
NEW Community ruleset:

rule_url=https://snort.org/downloads/community/|community-rules.tar.gz|Community
Edit these lines
rule_path=/etc/snort/rules/
local_rules=/etc/snort/rules/local.rules
snort_path=/etc/snort
config_path=/usr/local/etc/snort/snort.conf
distro=Ubuntu20-4
If you run the next command you should see the message Fly Piggy Fly!
Run /usr/local/bin/pulledpork.pl -c /etc/snort/pulledpork.conf -l
The final step is to modify cron to schedule the update once a week.
Crontab -e
0 2 * * 3 pulledpork.pl -c pulledpork.conf -i disablesid.conf -T -H
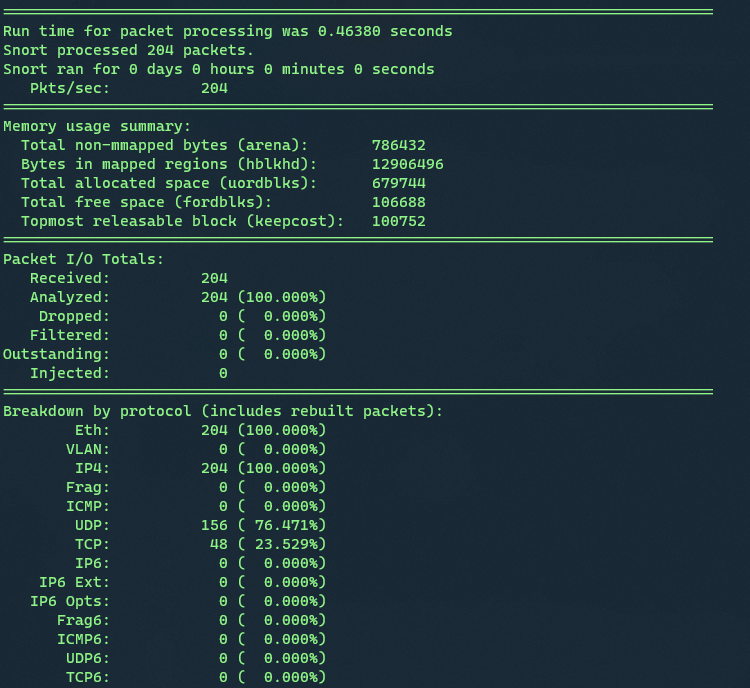
Checking
Logs goto /var/log/snort/
File snort.log gives all the default alert and logs. Use TCPDUMP (or snort) to read it, the file doesn’t need to be used by the snort process. Each time a snort is aborted, a new file with a .timestamp is created.

If we want to check snort.log.1676322020 then we run snort -r snort.log.1676322020
File alert logs all alert based on our rules → This is where we will take a look

Security Onion

Security Onion is a free and open platform for threat hunting, enterprise security monitoring and log management.
The NIDS (Network Intrusion Detection System) is one of the many features offered by Security Onion. The platform will send us alerts when malicious or suspicious traffic is detected. The mechanism is based on signatures, similar to SNORT rules, but Suricata rules are more flexible (Suricata is a free and open source network threat detection engine).
See Security Onion Solution for more details.
The installed version is the EVAL one, which is not recommended for production use. This internal documentation will serve as a proof of concept, and if the results are relevant, we can consider installing the Standalone version.
Security Onion provides a cheatsheet that you can download here.
The installation is fairly simple, as you only need to use the provided ISO and answer a few basic questions. The interface is simple to use, and you'll feel at ease after just a few clicks.
Conclusion
Regardless of the security measures you implement, it is essential to maintain security awareness, perform regular updates, and ensure your safety at all times!
Read about Gigabit Ethernet here