Integrating an Adyen drop-in solution to your Vendure ecosystem

If you’ve been interested in using Adyen as a payment provider for Vendure, I am happy to tell you that we have a new Vendure plugin available for you to try out!
⚠️ DISCLAIMER: Our plugin is not yet production ready, but it will surely be a great base for you to build upon. Right now, you can make extensive testing with it to see how Adyen would play with your backend.
In this blog post, we'll explore how to configure an Adyen test account, implement our plugin into Vendure in a dev environment and add the Adyen drop-in component on your storefront. After that, we’ll go through the creation of a payment from end-to-end.
Table of Contents
- 1 | Sign up to Adyen
- 2 | Adding the plugin
- 3 | Configuration on Vendure
- 4 | Storefront integration
- 5 | End-to-end testing
- 6 | Final word
- 7 | FAQ
Sign up to Adyen
First and foremost, create an Adyen test account here.
ℹ️ At the time of this writing, the “Website” field is a bit stubborn, presumably because of a weird RegEx. Don’t let it stop you! Just copy and paste Adyen’s own website URL from the example.

Then, confirm your email and log in.
“Merchant accounts“ vs “Company account“
When you login for the first time, Adyen will ask which type of payment you need to handle. I chose ECommerce for my specific needs.
ℹ️ Your COMPANY account is responsible for one or more MERCHANT accounts. You always make payments using a MERCHANT account. You can see the default merchant account Adyen created for you in the top left corner of the UI. Most likely, this merchant account is named [AccountName]ECOM.
API Credentials
Next, follow Adyen’s documentation to create an API key and save it in a secure location. You can immediately test your API key with a raw request to make sure it works:
curl https://checkout-test.adyen.com/v70/payments \
-H 'x-api-key: <YOUR_API_KEY>' \
-H 'content-type: application/json' \
-d '{
  "merchantAccount": "<YourCompanyECOM>",
  "reference": "My first Adyen test payment",
  "amount": {
    "value": 1000,
    "currency": "EUR"
  },
    "paymentMethod": {
    "type": "scheme",
    "encryptedCardNumber": "test_4111111111111111",
    "encryptedExpiryMonth": "test_03",
    "encryptedExpiryYear": "test_2030",
    "encryptedSecurityCode": "test_737"
  }
}'
If everything is set up properly, you’ll receive a response with an “Authorised” result code and some additional data.
Then, you can see this first payment in all its glory in Transaction >> Payments on Adyen’s admin UI.

ℹ️ Further exploration testing: Adyen provides an incredible API Explorer to generate mock requests and responses. If you want to do more with Adyen that just integrating our plugin, it’s a good idea to play around with the Explorer to get yourself familiar with how Adyen works.
Setting up a webhook
Adyen will asynchronously send webhooks to your Vendure server. The only type of webhook you need for now is a “Standard webhook”, which contains confirmation or refusal for each payment.

You can follow Adyen’s documentation to set it up completely, but very little needs to be configured for our plugin to work.
You can generate a HMAC key (which is used to verify the identity of the webhook), Basic Auth credentials (for a small added layer of security), but most importantly you need to specify an endpoint on your Vendure server to receive this webhook. The endpoint from our plugin is /webhooks/adyen/standard.
Most likely, your test server is on localhost for development, so you need to expose it publicly. This can easily be done with a handy tool called ngrok.
ngrok
Ngrok allows you to put any app online and share it in a matter of seconds. Follow their guide to set this up.
Once it is installed on your computer, you can simply run:
ngrok http <VENDURE_PORT>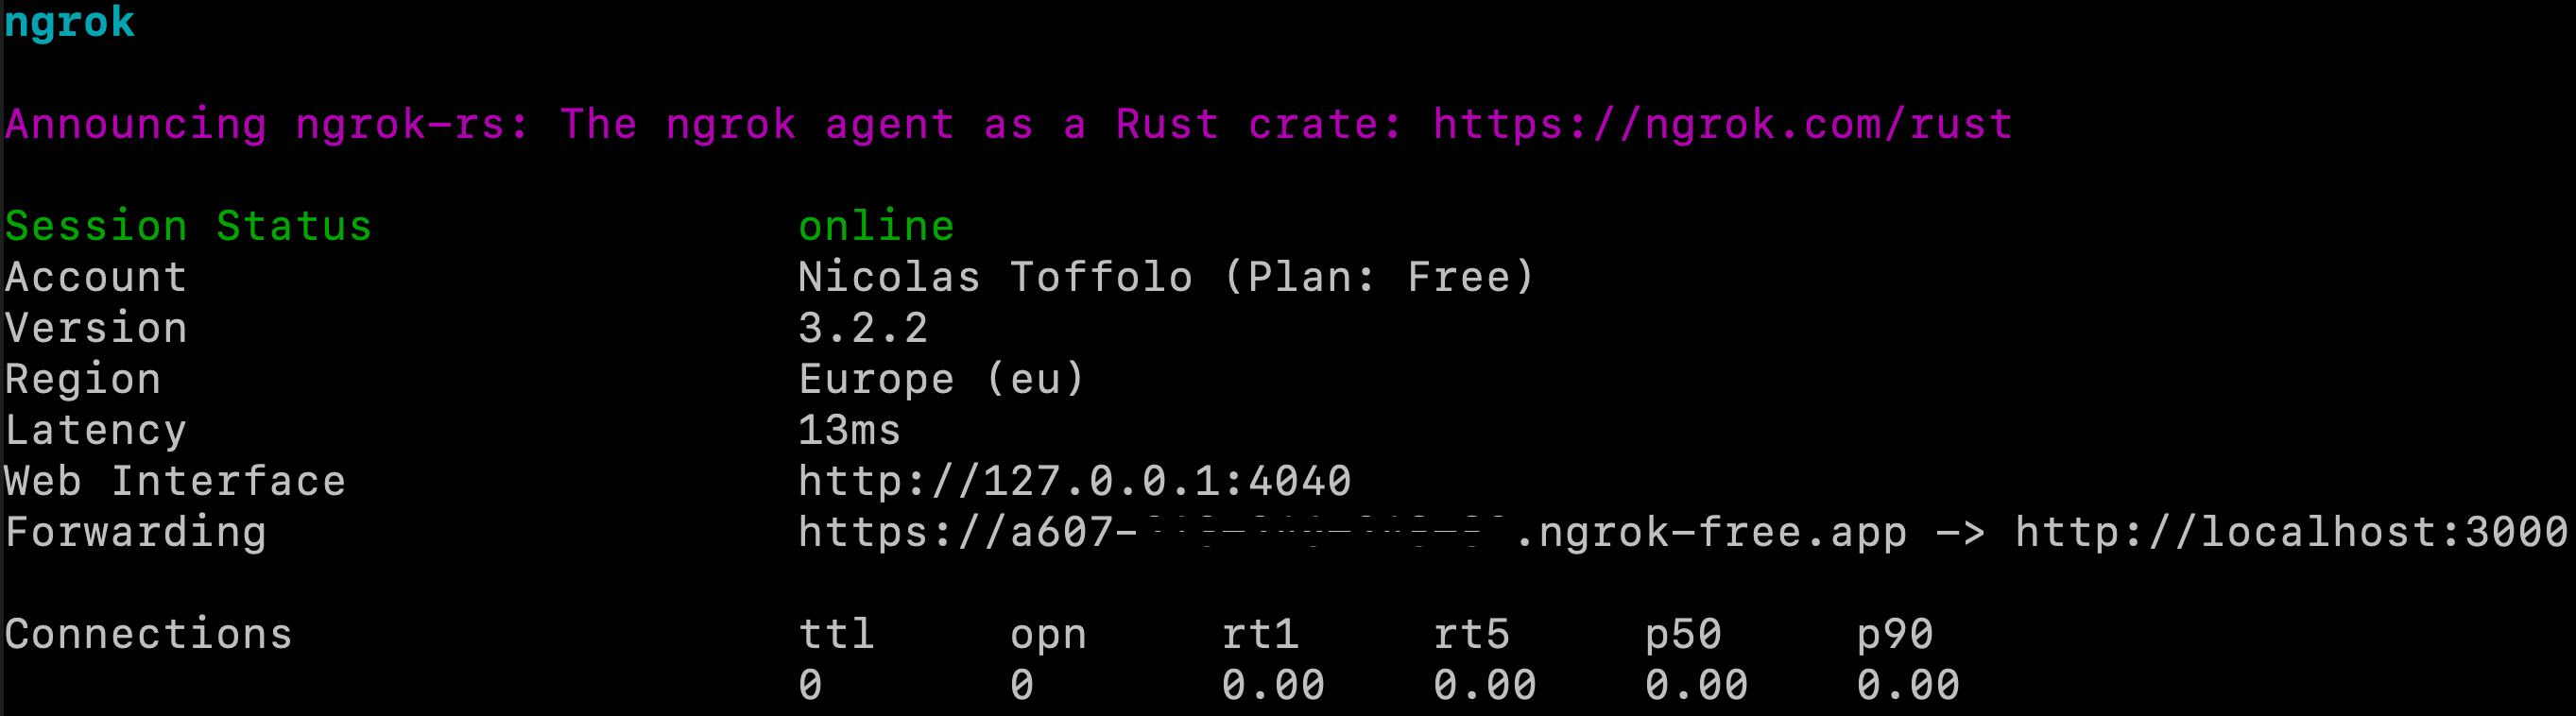
Leave this terminal running and copy paste the Forwarding link into the “Server configuration” field.
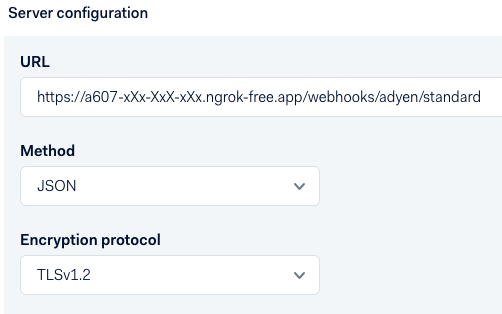
The forwarding link will change every time you run ngrok, so make sure you update your webhook every time you test it.
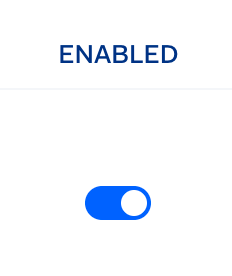
Save your configuration then ensure that your webhook is enabled!
Adding the plugin
Use your favourite package manage to download the plugin.
E.g: npm i @mirahi/vendure-adyen-dropin-plugin
In your vendure-config file, import AdyenPlugin from our module:
// vendure-config.ts
import { AdyenPlugin } from "@mirahi/vendure-adyen-dropin-plugin";
// ...
export const config: VendureConfig = {
  // ...
  plugins: [
    AdyenPlugin.init({
      environment: "TEST",
      hmacKey: process.env.HMAC_KEY,
      basicAuthCredendials: {
        username: process.env.BASIC_AUTH_USERNAME as string,
        password: process.env.BASIC_AUTH_PASSWORD as string,
      },
      paymentMethodCode: "payment-adyen", // Optional (default value)
    }),
    // ...
  ]
}
The arguments you pass to the init method are the ones related to receiving webhooks. None of them are actually required (“TEST“ environment is default), but if you configured HMAC and Basic Auth during the previous steps, you can indicate them here. In a “LIVE” environment, HMAC is required.
⚠️ As for the paymentMethodCode, it defaults to "payment-adyen" in our plug-in. If you REALLY want to change this string into something else, you can do it by changing this value, but make sure you later use the same code when "Adding a new payment method" to your channel through the Vendure Admin UI!
Finally, boot up your Vendure server. Adding this plugin will change your database schema (the Order entity gets an extra customField to create payments), so make sure the migration is being handled or that your dev environment synchronises automatically (learn more here)
Testing with a webhook
Adyen provides yet another neat tool for testing. You can find it inside the webhook configuration menu: Developers >> Webhooks, then Edit ✏️ your webhook.
Click “Test configuration” at the bottom of the screen, choose an event, and fire the test. Adyen should indicate “Event delivered successfully!” and your Vendure logger should say:

Configuration on Vendure
There are two things you need to do on your Channel page on Vendure: adding a payment method to your channel, change your channel token.
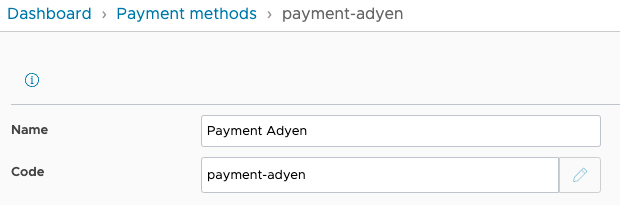
Adding a new payment method
You need to add a new Payment method for your channel. Its code must be payment-adyen (or the custom code you chose for paymentMethodCode as argument in the plugin init method).
Also add the required information in the Payment Handler sub-menu:
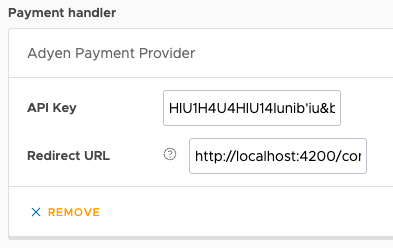
The ”API Key” field is asking for your Adyen API key. The “Redirect URL” field is used to specify the path at which your shopper should be redirected after they have filled the drop-in.
Change channel token
Internally, our plugin needs to match an incoming payment with a specific channel in your Vendure server. This requires that your channel token is the same as your Merchant Account name on Adyen. The easiest way to achieve this is to change your channel token in Vendure.
Go to Settings >> Channel >> Edit and use your Adyen merchant account name here:

If the token and the merchant account name don’t match, you’ll get this error:

Storefront integration
ℹ️ We made a very simple storefront integration example that you can find here.
Depending on your storefront, the drop-in integration will differ. Again, you can follow Adyen’s documentation for this.
It doesn’t need to be very fancy to work, here is my React code from a NextJS 13 app as an example:
"use client";
import "@adyen/adyen-web/dist/adyen.css";
import { useEffect } from "react";
import AdyenCheckout from "@adyen/adyen-web";
import { notFound } from "next/navigation";
import type { CoreOptions } from "@adyen/adyen-web/dist/types/core/types";

type PaymentPageProps = { searchParams: { [key: string]: string | string[] | undefined } };

export function PaymentPage({ searchParams }: PaymentPageProps) {
  const { id, sessionData } = searchParams || {};
  if (!id || !sessionData) notFound();

  const configuration: CoreOptions = {
    environment: "test", // Change to one of the environment values specified in step 4.
    clientKey: process.env.NEXT_PUBLIC_ADYEN_CLIENT_KEY, // Public key used for client-side authentication: https://docs.adyen.com/development-resources/client-side-authentication
    analytics: {
      enabled: false, // Set to false to not send analytics data to Adyen.
    },
    session: {
      id, // Unique identifier for the payment session.
      sessionData, // The payment session data.
    },
    // Any payment method specific configuration.
    // Find the configuration specific to each payment method:  https://docs.adyen.com/payment-methods
    paymentMethodsConfiguration: {
      card: {
        hasHolderName: true,
        holderNameRequired: true,
        hasCVC: true,
        // billingAddressRequired: true,
      },
      bcmc: {
        hasHolderName: true,
        holderNameRequired: true,
        hasCVC: true,
        // billingAddressRequired: true,
      },
    },
  } as const;
  useEffect(() => {
    (async () => {
      const checkout = await AdyenCheckout(configuration);
      checkout.create("dropin").mount("#dropin-container");
    })();
    // eslint-disable-next-line react-hooks/exhaustive-deps
  }, []);
  return <main id="dropin-container" />;
}

export default PaymentPage;
The following figure summarises the steps in making a payment with Adyen:
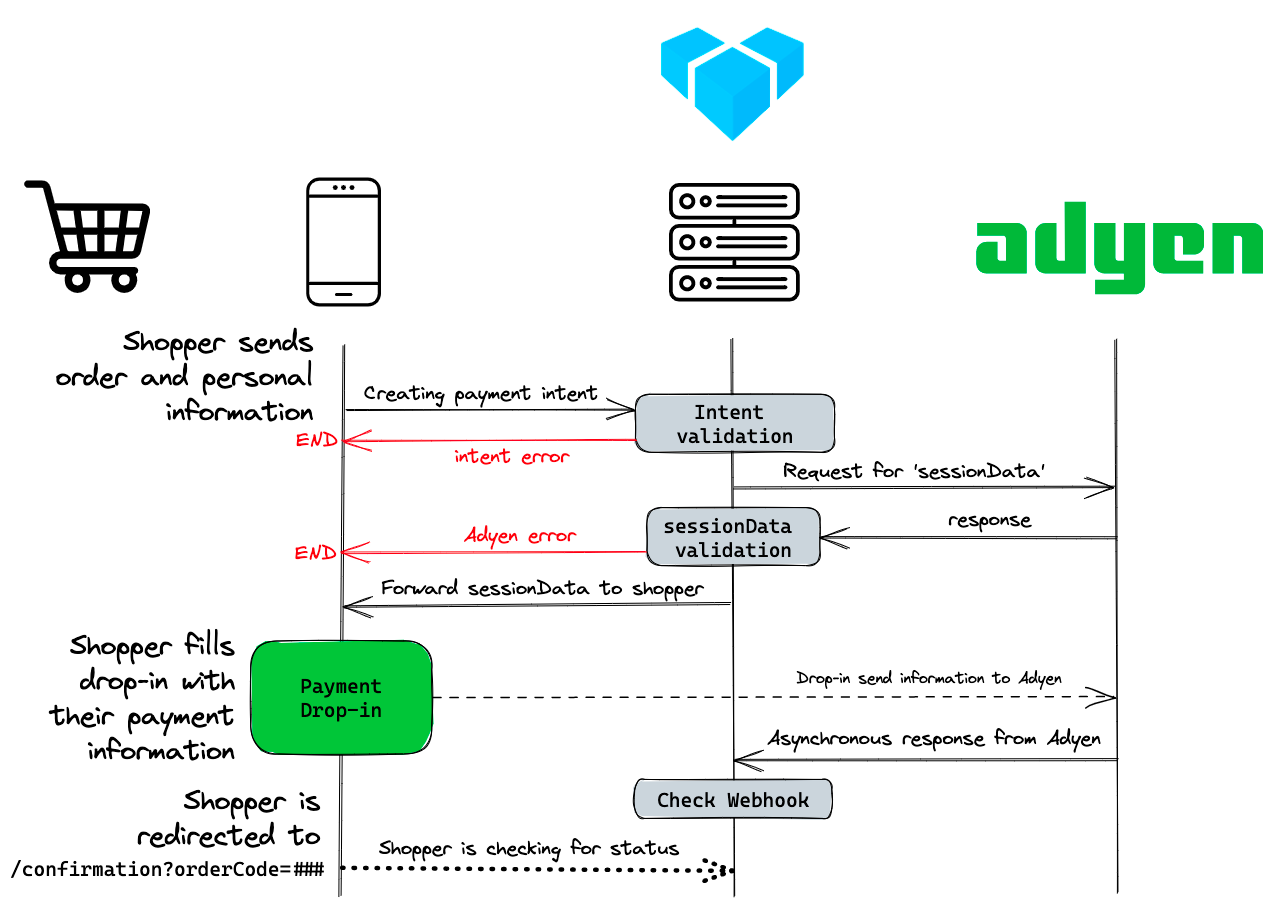
Create a payment intent
To initiate a payment, you need to use a custom GraphQL mutation called createAdyenPaymentIntent. Here is how to write it:
mutation createPaymentIntent {
  createAdyenPaymentIntent {
    __typename
    ... on AdyenPaymentIntent {
      transactionId
      sessionData
    }
    ... on AdyenPaymentIntentError {
      errorCode
      message
    }
  }
}
Internally, the plugin will check if the active order provides adequate data to create a payment intent. If there is a problem, sessionData and transactionId will be undefined.
Our plug-in will append an orderCode parameter to the Redirect URL you specified in the Payment method so that you can easily query the order from your storefront. For example:
http://localhost:4200/confirmation?orderCode=MPBRTQFGU791ZRBC
Adyen also appends additional parameters that you can use or disregard based on your integration.
ℹ️ When you design your confirmation page to show the payment status, keep in mind that an Order can be queried from the shop-api by code (see the orderByCode in Queries, but this will only work if the order is out of the “AddingItems” or “AddingPayment“ states. If it’s not (because the payment was declined, for example), you need to query it as an activeOrder and probable find a “Declined” payment added to the order. Check Vendure’s Order Workflow to learn more.
End-to-end testing
Everything is set up! You can go to your storefront and start mocking orders from end to end.
Mockup card data
When prompted with choosing a payment provider, you need to enter valid test values that Adyen provides in their documentation.
For example, for the Bancontact system we use in Belgium, this is valid:
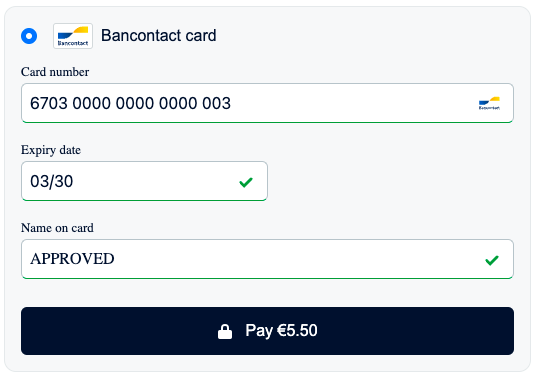
The “Name on card” field in the drop-in maps to the holderName property in Adyen’s API. This value can be manipulated to trigger specific result status for the payment (the list of all available codes is here). This is extremely useful to test your integration!
ℹ️ If you don’t see the Name on card field in the drop-in, you need to add holderNameRequired : true to the AdyenCheckout configuration.
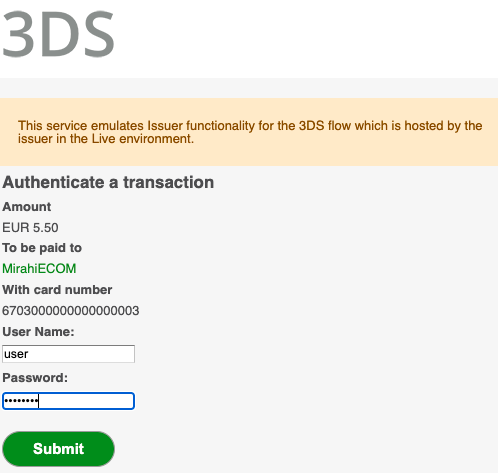
After that, you’ll be prompted with a 3-D Secure external drop-in. Again, you need to provide specific test values for the payment to go through:
- - User Name =
user - - Password =
password
Finally, under Transactions >> Payments in the Adyen admin panel, you will soon see your new payment with a status corresponding to the mock-up code you sent (if any).
With the above example, providing APPROVED as a holderName automatically gives an Authorised status. If you messed up a step, the payment will be Refused. Make sure you can handle all situations in your storefront and provide adequate feedback to your shopper.
ℹ️ Payment status: By default, a payment is “auto-captured” by Adyen, which means it gets settled automatically (Capturing is the act of transferring the reserved funds from the shopper to the merchant.)
On your Vendure backend, the payment is immediately “Settled”, but Adyen only transfers funds after a default 2-hour delay (funds are only “reserved”, not actually taken from your shopper bank account). This delay is useful when you want to cancel an order, because you won’t need to actually refund the shopper, Adyen will just lift the hold on those funds. To change the delay, check this documentation.
Final word
That’s it for now! Thank you for reading! We hope our plugin can be useful to you. If you wish to contribute or fork this plugin, you can find its repo here.
If you want to integrate another payment provider to Vendure, check out payment integrations.
FAQ
Q: All this e-commerce jargon is a bit daunting…
I feel ya! Thankfully, Adyen made a great glossary to help you out.
Q: Nothing happens when I click “Pay” in the Drop-In!
A: Adyen might be refusing your payment processing because of non-uniform order data. For example, make sure your order total is the exact same on your Vendure backend and on Adyen (you might be screwing this up by mixing up price and priceWithTaxes, e.g.).
Q: Everything is set up correctly, but Adyen doesn’t return any sessionData. What can I do?
A: If you get this error message on your Vendure logger…

…there is nothing you can do but wait 🤷